Installation
The Axiell WebAPI, implements the Axiell core-software functionality for web applications and is installed as a supplementary program to an existing web server (currently minimally IIS 10.0 for Windows Server 2016). The client-side Axiell WebAPI is a function library that uses the ASP.NET Web API framework (and although wwwopac.ashx is still part of the call to the WebAPI, it is no longer a physical file). This API (Application Programming Interface) is normally accessible through programming languages or via the REST interface style (send a URL and receive XML).
(Since the program has no graphical interface, a (web) application is needed to call the functions of the API. Such an application can be a website on which visitors are able to search your catalogue via the internet, and maybe place reservations, or take care of other business. For this, the standard Axiell Internet Server (AIS) web application (which can largely be adjusted to your preferences) is available: please see the Axiell Internet Server installation guide for information on how to install a complete Internet Server package.)
-
Place the folders and files from the WebAPI package in an appropriate folder on the server.
-
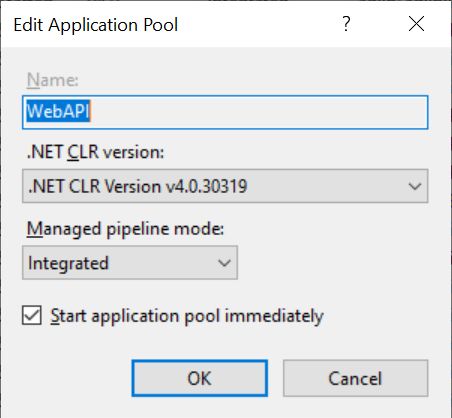
In IIS, underneath Application pools, create a new application pool with a sensible name. (If multiple web services are present on the server, it’s best to configure one application pool per web service, to keep the processes of the web services separated at all times.
-
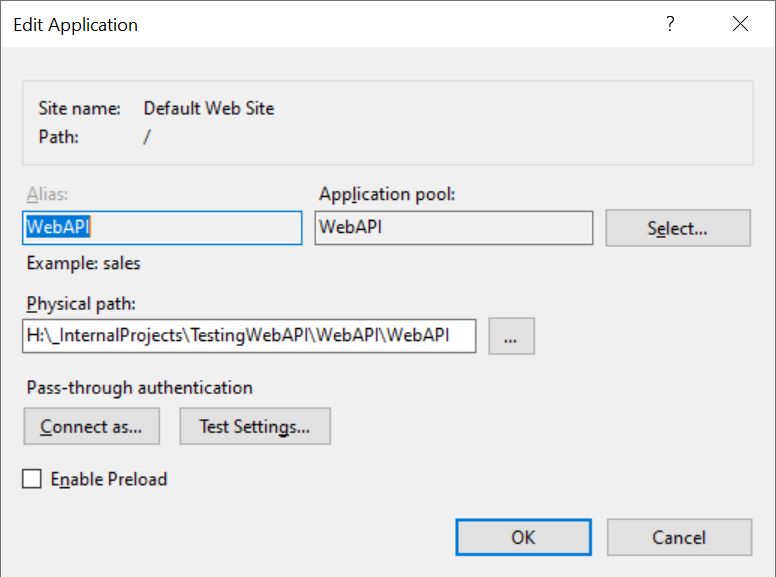
You need to make at least one so-called application in IIS, to secure your server and to create an internet address. In IIS, open the Sites node. Then right-click the site in which you want to accomodate your web service, the Default Web Site for instance. In the pop-up menu that opens, choose Add Application. The Add Application window opens. First, enter the desired Alias for the IIS application, for example WebAPI or AxiellWebAPI; choose a clear, descriptive name. The format of the base URL for calling the WebAPI web service then becomes: https://<webserver>/WebAPI/wwwopac.ashx Click the Select button to set the Application pool to the pool you created earlier. Then select the path to the physical folder on your system in which the WebAPI bin sub folder and files (including the configuration file adlibweb.sample.xml and/or adlibweb.xml) can be found.
-
Click OK to create the application.
-
In a new installation you'll only have an adlibweb.sample.xml file. Copy and paste this file in the same folder and rename it to adlibweb.xml. The adlibweb.xml file serves to configure and initialize the WebAPI. In there you must at least enter a <databasepath> and a <database>: see the next topic for all possible settings.
-
It is also important to protect the WebAPI from unauthorized access. Therefore, as a rule, make sure you to set IIS authentication on it. Authentication can be set by enabling Basic Authentication in IIS on the WebAPI or by using an ApiToken.
-
If your WebAPI should not be accessible though direct browser calls from the internet (because only a public web application like Axiell Internet Server should be allowed to make those calls, maybe via a proxy), then the WebAPI should only be accessible on localhost and the WebAPI application should be deployed as a sub-application of the AIS application in IIS. To restrict direct WebAPI access to localhost, proceed as follows:
- For the WebAPI application in IIS, open IP Address and Domain Restrictions.
- Click Add Allow Entry in the right panel.
- Under Specific IP address add 127.0.0.1 (for localhost) and click OK.
- Then click Edit Feature Settings and change Access for unspecified clients to Deny.
Now the WebAPI can only be accessed from the local machine using the localhost address.